For my animation I wanted to a simple camera movement mimicking the multiplane camera effect famously created by Disney animation studios to mimic camera movement in early animations. I didn't want to go too extreme with the camera movement as that can require the creation of a ton of assets that would take up most of my time with this project.
To start I created 3 separate layers for my animation to create my own multiplane.
Top Layer: Anything in front of the animation layer I am going to place here. Rain, Foliage, Fog, etc.
Middle Layer: This is my main animation layer with the waterfall animation
Background Layer: This is just the background layer with the trees so i can attempt to mimic a swaying tree kind of camera movement. It ended up not looking as great as I wanted. I can also use this layer to change the lighting of the sky.
I looked for several techniques on how to make camera movement and I am trying to create my own I have this image in my head where the camera trucks in from the left side behind the bushes to the right revealing the house in the foreground while the camera adjusts to the light.
After watching several tutorials and concept videos about camera movement I was sure I knew kind of what I had to do to get the effect I wanted. Keeping the middle layer and background layer stationary I could create the illusion of a camera moving by moving the foliage itself instead often entire scene. Below you can see me setting up the movement of the foliage to move out of the way.
(Don't mind the audio I was listening to some videos while recording and didn't realize the sound was being picked up.)
Seeing how well it worked I wanted to add a little more to the scene making the background layer move creating a sort of parallax effect to make the space feel more real I also needed to add the lighting blur I was looking for kind of a similar effect to when you walk outside to fast and are blinded for a moment.
In this version you can see that I have implemented the parallaxing effect and the lighting I wanted. Both were pretty easy I was able to learn more about keyframe animation The ability to create assets and then move them around with keyframes kind of like you can in any video editing software which luckily enough I have had extensive experience with my background in film so it was easy to pick up after looking at a few tutorials. Both the background moving, the foreground moving, and the lighting effect were all created using keyframes which is wonderful because I don't have to worry about hand drawing anymore my job has gotten a bit easier.
The lighting effect was a little tricky I had to add an effect in the software called Transparency that allowed the use of keyframes to to bring up and down the opacity of a layer which gave me a good idea for creating lightening flashes for my rain sequence I want to create further on.
Reflection:
This took a bit longer than expected to come together but now that I am warmed up to everything I feel I will be able to increase my workflow. being able to move assets with keyframing worked better than I expected which was good but animation with them feels kind of impersonal to me as I am such a big fan of hand drawn frames.
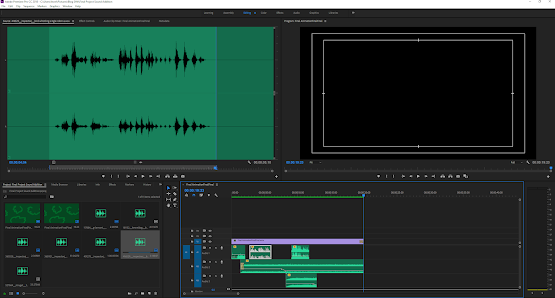
Quick final update before I post my final project I went in to Adobe Premiere to add sounds to my animation as I like the program for video and audio editing and I just wanted to post what my final timeline looks like. I used sound effects from freesound.org a free sound effects database and was able to get all the sounds that I wanted for my project. This is my final set up in Premiere I was able to get everything where it needed to be in post. I exported my animation from Toon Boom Harmony as a movie file and then straight imported it into a Premiere project. The final version will be my next post to my blog. Reflections: I wish I had more time to figure out adding sounds in Toon Boom itself but I am running out of time and I don't like the quality at which the project exports itself from the program. References: freesound.org https://www.adobe.com/products/premiere.html
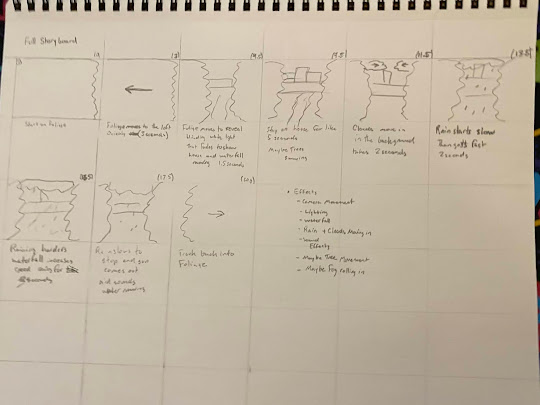
I spent some time updating the storyboard last week I just wanted to make a post about updating my plan again. Here is a bigger version of my storyboard and I am laying out the techniques I am trying to learn for this project. Techniques for animation: 1. Waterfall animation 2. Camera movement 3. Lighting changes 4. Clouds and Rain I wanted to cut down on one of the techniques I was trying to learn as it was a big ask and attempting to do both the rain and fog was a big time sink something I don't have much of. Here is my updated storyboard. I also plan on adding sound effects for the final part of the animation to add to the realism.


Comments
Post a Comment